Web Studio Editor Reference
Web Studio ⎋ is Codecraft Works’ online Integrated Development Environment (IDE) for web projects. It supports HTML, CSS, and JavaScript. This page describes every part of the editor. If you are new to Web Studio, start with the Web Studio Quick Start.
Who Can Do What
What you see in the editor depends on whether the project is yours:
| Your project | Someone else's project | |
|---|---|---|
| Open it | Yes | Only if it is public (Codecraft Works instructors can also open private projects) |
| Save changes | Yes | No |
| Change settings, upload media | Yes | No (settings are shown, but read-only) |
| Clone | Yes | Yes, if it is public and you are signed in |
| Cloud variable | Yes | No |
| Share | Yes, once it is public | Yes, if it is public |
Anyone viewing a project can type in the code panes to try ideas out, but only the project’s owner can save those changes. To keep your own version of someone else’s project, clone it.
The Toolbar
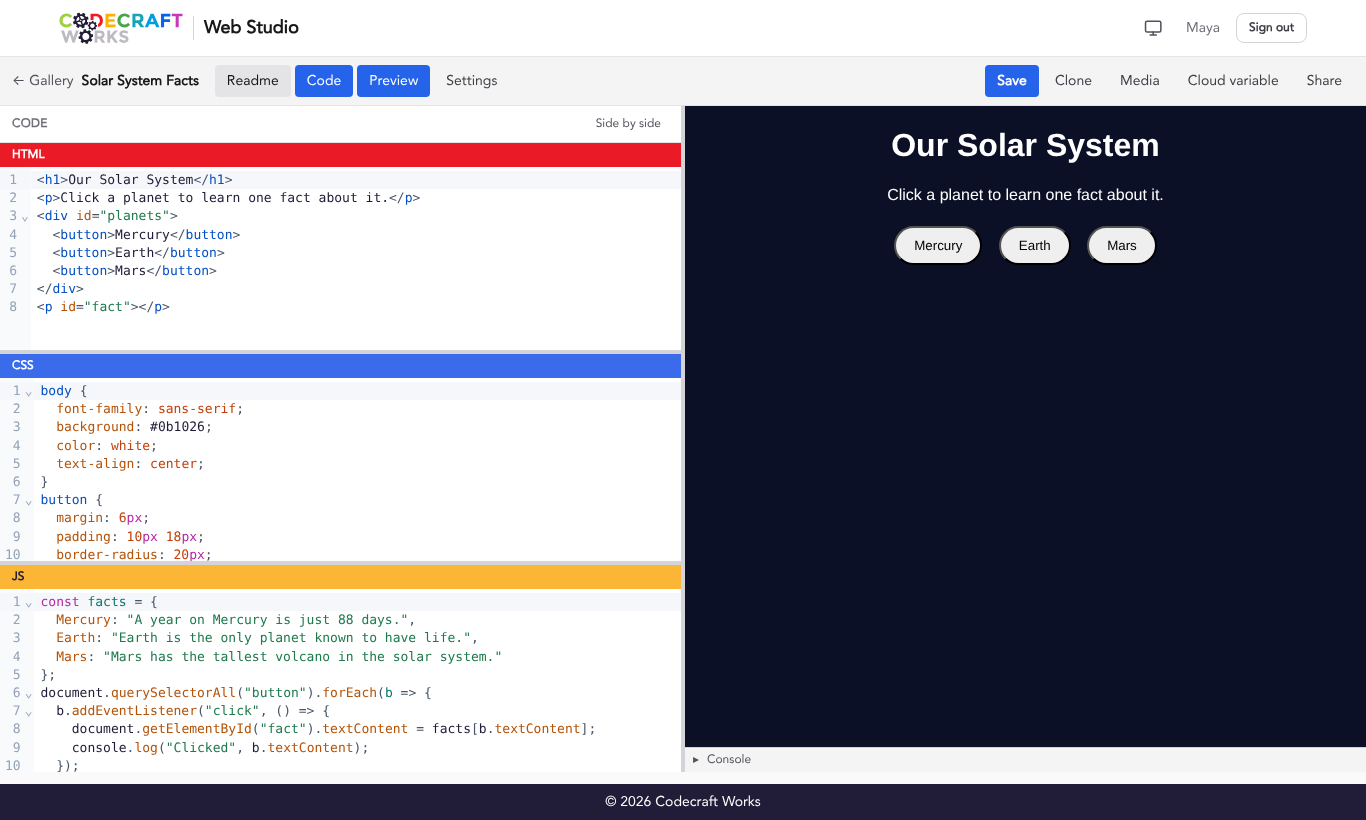
From left to right, the toolbar shows:
- ← Gallery returns to the Web Studio home page.
- The project name.
- A Private label if the project is private, and a Locked label if it is locked.
- Unsaved changes if you have edits that have not been saved.
- The Readme, Code, Preview, and Settings toggles.
- The Save, Clone, Media, Cloud variable, and Share buttons.
Toggles
Each toggle shows or hides one part of the screen. Toggles that are turned on are highlighted in blue. At least one part of the screen must always be showing.
- Readme shows the project’s README to the left of the code. The Readme starts open when a project has a README.
- Code shows the HTML, CSS, and JS panes.
- Preview shows the live preview and the console.
- Settings replaces the editor with the project’s settings. Select it again to go back to the editor.
On narrow screens such as phones, only one part shows at a time. The project’s owner starts on Code; everyone else starts on Preview.
Buttons
- Save saves your code. It only appears on projects you can edit. You can also press Ctrl+S (Windows/Chromebook) or Command+S (Mac). Web Studio does not save automatically, so save often! When the save finishes, a “Saved” pop-up confirms that your changes are saved and that the published page will update a moment later.
- Clone makes your own copy of the project. See How to Clone a Web Project.
- Media uploads images, sound, and video for use in your project. See How to Add Media to Web Projects.
- Cloud variable stores a small piece of data with the project. See Cloud Variables below.
- Share shows the links you can use to share your project. It only appears when the project is public. See How to Create and Use Share Links.
Code Editor
The code editor is divided into three panes labeled HTML, CSS, and JS. Drag the bars between them to resize them, and use the Side by side / Stacked button above the panes to change how they are arranged.
The code editor includes:
- Line numbers along the left side of each pane.
- Syntax highlighting, which colors different parts of your code.
- Automatic closing brackets and quotes.
- Code suggestions (autocomplete) as you type.
- Code folding: select the small arrow next to a line number to hide or show a block of code.
- Search with Ctrl+F (Windows/Chromebook) or Command+F (Mac).
- Tab to indent and Shift+Tab to un-indent.
Press Ctrl+1, Ctrl+2, or Ctrl+3 to jump to the HTML, CSS, or JS pane. Press Escape to move from the code back to the toolbar.
You only write the contents of your page’s <body> in the HTML pane. Web Studio adds the rest of the page, like the <head> and page title, for you.
Live Preview
The preview shows your page as a visitor would see it, and updates about once a second as you type. There is no Run or Refresh button.
If your JavaScript gets stuck in a loop that runs for too long, Web Studio pauses your JavaScript and shows the message “JavaScript is paused because a loop ran too long.” Fix the loop, then select Resume JS on the JS pane bar.
A few things behave differently in the preview than on your published page:
- Images linked from some other websites may appear blank in the preview, but they will show on your published page.
- Fetching your cloud variable does not work in the preview, but does work on your published page.
- Anything your code saves with
localStorageorsessionStorageis forgotten each time the preview reloads. It is saved normally on your published page.
Console
The console sits below the preview and starts closed. Select the Console bar to open or close it. Web Studio remembers whether you left it open.
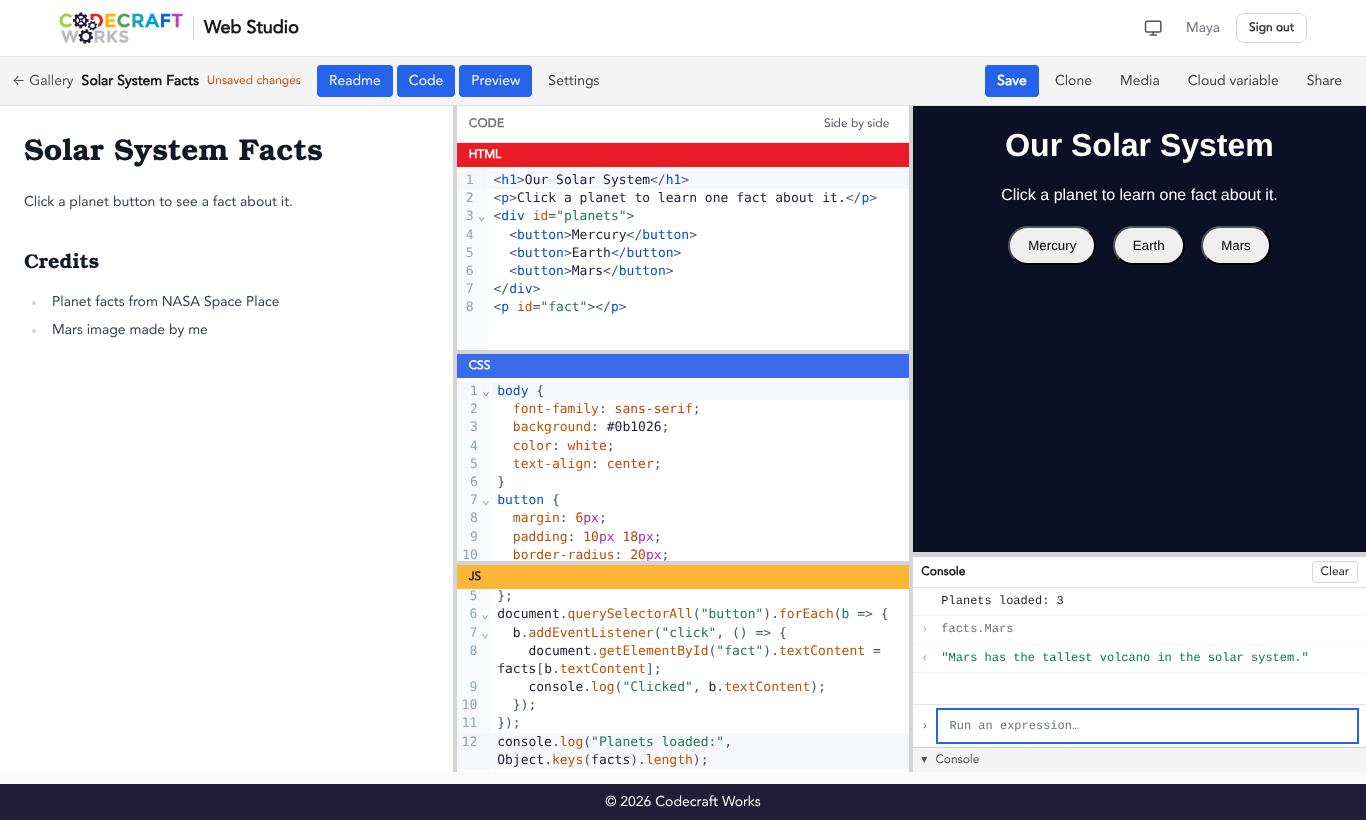
- Anything your JavaScript logs with
console.log(),console.warn(), orconsole.error()appears here. - Errors include the line number in your JS pane where the error happened.
- Type a JavaScript expression in the Run an expression… box and press Enter to run it against your page. Use the up and down arrow keys to bring back expressions you ran before.
- Select Clear to empty the console.
- When the console is closed, a red number on the Console bar tells you how many errors there are.
Project Settings
Select the Settings toggle to open the project’s settings. Anyone can view a public project’s settings, but only the project’s owner can change them.
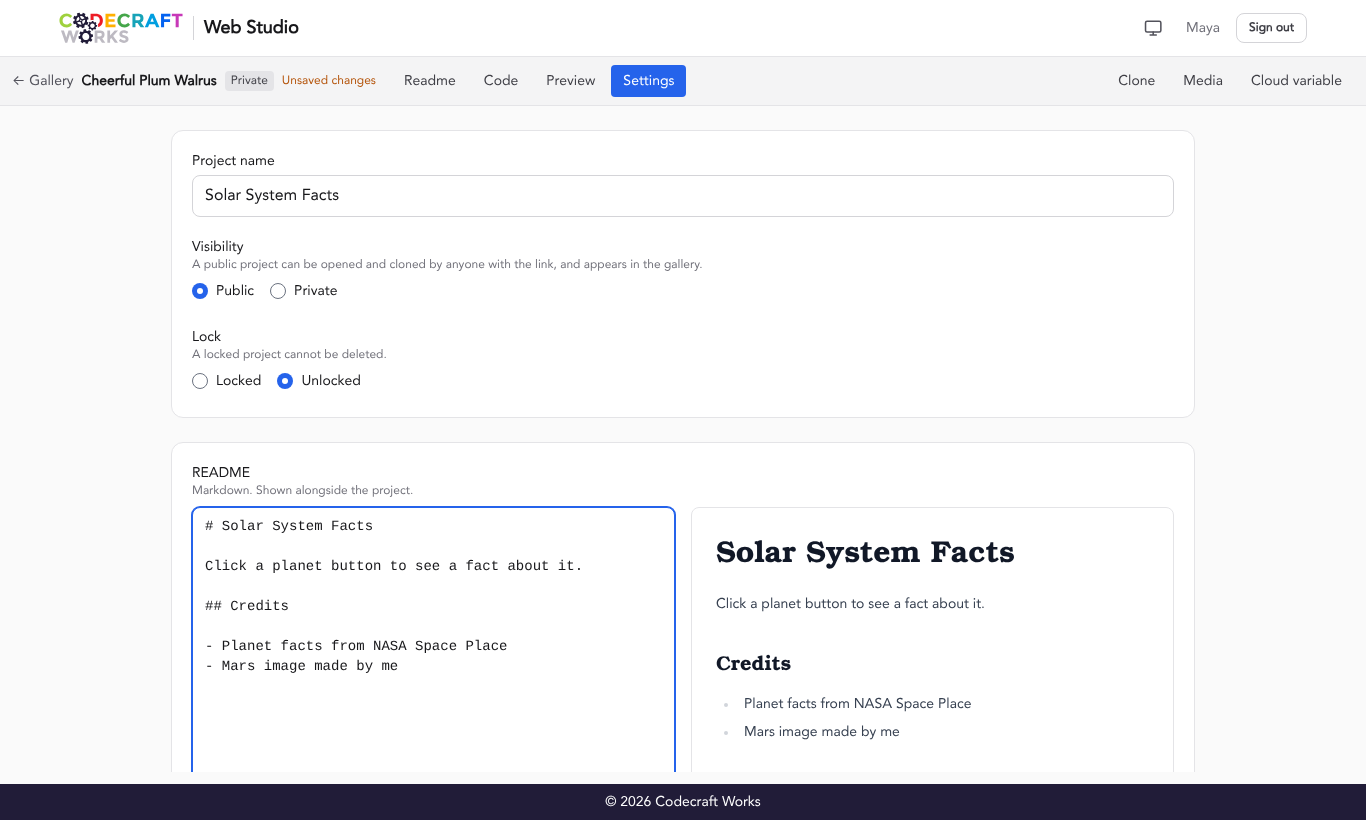
- Project name: the name shown in the gallery and on your published page’s browser tab.
- Visibility: Public or Private. New projects start out Private.
- A public project appears in the gallery and on your profile, can be opened and cloned by anyone with the link, and has a Share button.
- A private project can only be opened by you and your Codecraft Works instructors. It does not appear in the gallery or on your profile.
- Lock: Locked or Unlocked. A locked project cannot be deleted, which protects finished work from being deleted by accident. New projects start out Unlocked.
- README: write a description of your project using Markdown ⎋. A preview of the formatted README appears beside the text box. See How to Create a Readme in Your Project.
- Details: the project’s author, when it was created, and when it was last changed.
Select Save settings to save your changes.
Deleting a Project
To delete a project, open Settings and select Delete project. You will be asked to confirm. Deleting a project also deletes its published page, and it cannot be undone. If the Delete project button is grayed out, the project is locked; set it to Unlocked and save your settings first.
Cloud Variables
A cloud variable stores one JSON value with your project, like a high score table, a shared counter, or some saved settings. Your project’s JavaScript can read it while the project runs. Only the project’s owner can see the Cloud variable button.
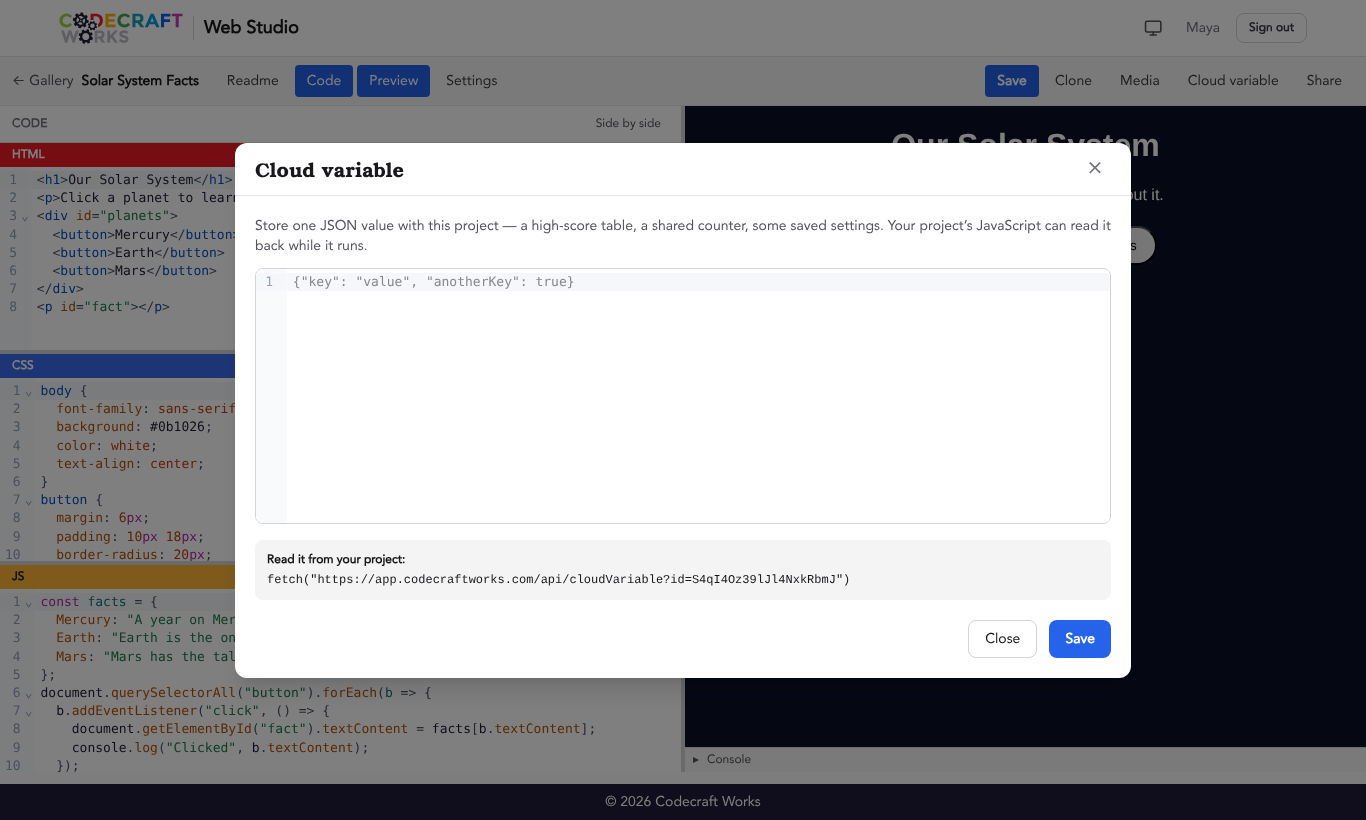
- Select Cloud variable in the toolbar.
- Enter a valid JSON value, such as
{"highScore": 120, "player": "Maya"}. - Select Save.
The pop-up shows a line of code you can copy into your JavaScript to read the value. Each cloud variable must be smaller than 1 KB. Remember that cloud variables only work on your published page, not in the live preview.
Related articles
- Web Studio Quick Start
- How to Sign In to Web Studio
- How to Create a New Web Project
- How to Clone a Web Project
- How to Add Media to Web Projects
- How to Create and Use Share Links